Total Pageviews

Translate

Followers

Showing posts with label Practical Biomechanics for the Podiatrist: Book 2. Show all posts

Sunday, December 4, 2022

Accessory Navicular: Excerpt from Book 2: Practical Biomechanics for the Podiatrist

The following is an excerpt from Chapter 6 of Book 2: Practical Biomechanics for the Podiatrist

https://store.bookbaby.com/book/practical-biomechanics-for-the-podiatrist1


Accessory Navicular Syndrome


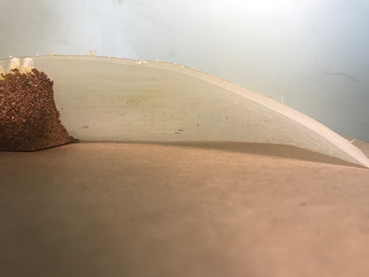
CT scan image of an Accessory Navicular


     The accessory navicular is part of the navicular bone, a second ossification center, that never fuses with the main part of the bone. It starts to form around 8-9 years old and is fully formed no later than 16 years old. 10% of your patients will have them and 30% of those will have them on both sides. The prominence caused by this accessory bone has been called the second ankle bone, os tibiale externum, or os navicularis. When they begin to hurt, it is important to actively treat, as a percentage will need surgical removal. The pain can be from the the posterior tibial tendon attachment, from the junction of the accessory and main part (either syndesmosis, synchondrosis, or synostosis), from obvious shoe pressure like from a bunion deformity, or from symptoms arising from the arch collapse. One of the main reasons the medial arch stays strong is the incredible anchoring of the posterior tibial tendon first into the navicular and then spreading out plantarly across the midfoot. If you disrupt this in any way, by having a small amount of the posterior tibial tendon diverted into the accessory bone instead, the foot can strain to hold up the arch and pain ensues. A definite weak spot is created.

     To tie this into Chapter 3 and 4 on gait and biomechanical examinations, when a patient presents with accessory navicular syndrome,  the most important examinations to do in 10 minutes (or 20 minutes) are:

       Signs of Excessive Pronation and Medial Column Overload

       Medially Deviated STJ Axis

       Functional Hallux Limitus

       Posterior Tibial Strength

       RCSP

       AJ Dorsiflexion


Common Mechanical Changes for Accessory Navicular Conditions (with the common ones in RED)

  1. Cam Walker with or without Crutches in the Immobilization Phase
  2.  Inverted Orthotic Devices or another high medial support Orthotic Device (like the Mueller PTTD device)
  3. Circumferential Taping with a Hole Cut Out for the Prominence
  4. J Strap with Leukotape for Pronation Control
  5. Progressive Posterior Tibial Strengthening Program
  6. Metatarsal Doming and Single Leg Balancing
  7. Strengthening of the 2 Long Flexors
  8. 2 Positional Single Leg Heel Raises
  9. Off Weighting of the Prominence (including shoe modifications)


     Cam Walker with or without Crutches in the Immobilization Phase may be your first treatment. Its mechanical function is in immobilization. If you suspect this problem, you need to err on the conservative side since the problem can lead to surgery if correctly or incorrectly treated. Any patient who first presents with a problem in my practice, that may need a surgical intervention, raises my red flags. You do not know how the injury is going to turn out. Usually looking at the prominence at first sight, before you take x- rays, you are going to know that you are dealing with an accessory navicular (or gorilloid navicular), and that some of these will require surgery. My goal is to get the patient to level 2 pain as quickly as possible on a consistent basis. If that requires a boot and time off work to drive the pain to 0-2, so be it. The goal is to create an environment that will allow them to heal. The crutches may be necessary initially as I experiment with tape, design an insert for the boot, or work on their inflammation. It is important to remember an EvenUp when you use a Cam Walker.


Here an EvenUp slips over the side not being immobilized to level the hips some


Practical Biomechanics Question #302: 3 patients present with accessory navicular pain with 3 different scenarios. Match the pain with the Phase of Rehabilitation.

  1. Pain walking each step
  2. Pain only when attempting to run
  3. Pain only at 3 miles into running


     Inverted Orthotic Devices or another high medial support Orthotic Device (like the Mueller TPD Foot Orthosis) is crucial quickly to stabilize that medial column. Their mechanical function is in reducing pronatory forces on the injured tissue. I am not an advocate of pre-fabricated orthotic devices for children who present with this problem regularly. If a growing child needs an orthotic device, I feel it should be designed for them as exactly as possible. Since most patients who present with significant problems from accessory navicular are juveniles, I discuss with the parents why we have to protect them, even if surgery is needed. I discuss that the presence of this problem will be a weak spot their entire lives and custom support is so crucial. In my book entitled “The Inverted Orthotic Technique” I discuss how this is prescribed.


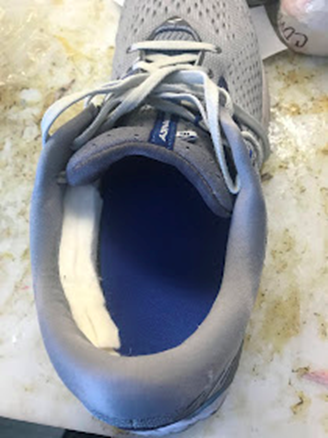
This shows the high medial column support from an Inverted Orthotic Device

Practical Biomechanics Question #303: How much inversion is placed into an Inverted cast to change the foot position one degree?


     Circumferential Taping with a Hole Cut Out for the Prominence is typically made from kinesio tape or RockTape perhaps 12-14 inches long and 2 inches wide. Its mechanical function is in light immobilization and support of the injured tissue. Before the tape is placed on the foot, and even without the backing removed, about 1 inch from the start a one inch diamond is cut in its center. The backing is then removed. The one inch diamond cut is placed over the medial prominence as the tape is applied gently over the dorsum of the foot from medial to lateral. When you get to the plantar surface of the foot, the tape is now pulled with “some force” from lateral to medial and up back to its origin and a little further usually slightly more distal (not an exact overlap so it grabs more skin). This type of tape needs to be rubbed in for a minute to activate the glue. You have to play with the tension implied by “some force.” The patient can learn this skill and the tape typically lasts 3-4 days.


Leukotape J Strap to create supination moments placed on with the foot slightly inverted and the Coverall protects the skin


     J Strap with Leukotape for Pronation Control is the most powerful way of taping for posterior tibial problems, including accessory navicular issues. Its mechanical function is in reducing pronatory moments across the injury and slightly immobilizing. Leukotape is by far the strongest tape I use. It is so strong, it has to have a layer of material called “Coverall” applied to the skin first. No Leukotape should ever touch the skin. Leukotape and Coverall are typically sold together with the Leukotape slightly narrower. Both types of tape of course are applied with the same pattern and it is called a “J Strap”. Occasionally, I tell patients to use 2 layers of Coverall overlapped by 50% to make a wider base to place the Leukotape on with. The tape is started just under the lateral malleolus and brought down and under the heel with no tension, then the foot is slightly inverted to neutral subtalar joint, and the tape is brought up medially over the accessory navicular and up at least 18 inches up the leg. The longer up the leg, the more you are spreading the force to stabilize over a bigger area. Again, like the circumferential taping, this tape should last 3-4 days before being removed. You typically remove it at night, so that you can rest your skin, and re-apply in the morning. It can be used in all of the Phases of Rehabilitation, with some of my recovered patients still using it for long backpacking trips months later.


Practical Biomechanics Question #304: Explain why some immobilization of the ankle is needed at times for an accessory navicular problem.


Resistance Bands exercise to isolate the posterior tibial tendon with inversion and ankle plantar flexed


     Progressive Posterior Tibial Strengthening Program is part of the Re-Strengthening Phase of this injury and vital to its success. Its mechanical function is to strengthen the posterior tibial fibers attaching into the navicular stabilizing the area. Chapter 11 (Book 3) will go through the aspects of strengthening for injuries, so I will just make three points here I want to highlight. First, the goal with all accessory navicular patients, is to progress them to 2 sets 25 repetitions at Level 6 resistance band. This can take months to accomplish so the health care provider has to be clear with the patient that even if they do not hurt, if they remain technically weak, that they can break down again. Second, the posterior tibial nerve which runs right next to the posterior tibial tendon, can make the exercises hurt. I always tell a patient if an exercise hurts they could be hurting themselves. This does not seem to include many patients strengthening their posterior tibial tendon. So, you have to have them do the exercise, and if there is no problem within the first 2 days, have them continue. For that reason, I have them strengthening the posterior tibial tendon every other day initially to check their response. And third, if you rely on anyone else to show your exercises, always check at the first visit. The posterior tibial tendon is strengthened with the ankle plantar flexed (pointed) and the foot inverted (abducted). Over half the time when I check the patient is not doing the exercise correctly.


Practical Biomechanics Question #305: What tendon are you strengthening if the foot is inverting against resistance, but the ankle is in neutral to dorsiflexed?


     Metatarsal Doming and Single Leg Balancing have both been described multiple times, including the last section on Cuboid Syndrome. Their mechanical function is to stabilize the injured area with muscle strength increases. Typically, with accessory navicular patients, metatarsal doming can be started immediately to keep the foot intrinsics in tone. The Single Leg Balancing is quite jerky and added at the end of the Re-Strengthening Phase or early in the Return to Activity Phase. You typically want the patient at Level 4 or 5 of the resistance bands before starting single leg balancing to ensure that they are strong enough.


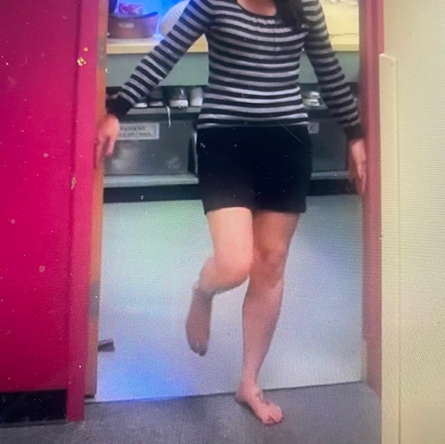
Single Leg Balancing with Light Touch on Door Frame


     Strengthening of the 2 Long Flexors is basically to help the posterior tibial tendon in its ankle plantarflexion and inversion functions, and probably some with arch support. Its mechanical function is to strengthen agonist muscles to the posterior tibial tendon. The posterior tibial tendon, along with the 2 long flexors, run alongside each other under the laciniate ligament under the medial malleolus. They have shared functions, so our strengthening should take some strain off the medial tissues. The classic toe curl exercise, where you build up to 100 curls of the toes as you grab the towel and pull it backwards, is a perfect way to strengthen the two tendons.


This is a common gym version where a Bosu Ball is used to balance on single and double legged. The toe flexors can be activated as you lean forward and try to maintain your balance.


     2 Positional Single Leg Heel Raises is one of the most powerful exercises you can prescribe and an important monitor of the success of a patient. Their mechanical function is to strengthen the foot and ankle taking stress off the injured area. The ability to do 25 straight knee (gastrocnemius) single heel raises and 12 bent knee (soleus) single heel raises is an indicator of the health of the tissue. However, it is more for the Return to Activity Phase, or later aspects of the Re-Strengthening Phase of Rehabilitation. When the patient presents with accessory navicular syndrome, the testing of whether they can perform a Single heel raise on that side is crucial. It has to be painless. As soon as your heel lifts from the ground, in the next ¼ of an inch of heel rise, the posterior tibial tendon will pull hard on the navicular to assist that heel raise. It is an important overall exercise as the gastrocnemius and soleus supinate the subtalar joint strongly, but it is also an important exercise to sense the strength or frailty of the accessory navicular complex with the posterior tibial tendon.


Practical Biomechanics Question #306: What muscles/tendons will help a weak achilles tendon to lift the heel off the ground (any of these structures can be injured because of this)?


     Off Weighting of the Prominence (including shoe modifications) is of course really common in ice skaters when they make custom boots and downhill skiers. Its mechanical function is to off weight the sore area. From the age the accessory navicular completely forms, they can become shoe fit nightmares or at least projects. Besides the shoe fitters tasks, on a daily basis the patient may need the use of some ¼ inch adhesive felt to off weight the prominence. The two common ways are 1) a one inch square piece above or proximal to the prominence, and 2) an “upside down smile” making a tent around it, but as close to it except plantarly. This usually is only needed for shoes which seem to bother it. I tell my patients, like my bunion patients, if they remove the shoe at night and the tissue is red at all, the habit of protecting it in those shoes should begin.


Here a double layer of ¼ inch adhesive felt is applied proximally in the shoe to off weight the sore point.

Monday, October 24, 2022

What to do when the Bottom of your Heel Hurts: Excerpt from Book 2 of Practical Biomechanics for the Podiatrist

This following is an excerpt from Book 2 of Practical Biomechanics for the Podiatrist


Plantar Heel Pain Problems
 
     Plantar Heel Pain is presumed plantar fasciitis, end of question, thank you, on to the next topic! Yet, there are plenty of reasons for plantar heel pain like bursitis, plantar fascial tearing or degeneration, heel spurs, intrinsic muscle soreness, stress fractures, bone bruises, neuritis, arthritis, to name the most common causes. Each of these entities can require some of the same treatments, and some other treatments than plantar fasciitis. Because plantar fasciitis dominates the landscape, we have to have suspicions early on that it may not be fasciitis. Most of my patients with plantar fasciitis have the following: worse pain in the morning, onset very gradual over months, no swelling is noted, normal treatments help somewhat (stretching, icing, arch supports), pain rarely over 4-5 on a scale of 0-10, and primarily in the heel where it attaches.
     For most clinicians, their treatment like mine will be gradually adding pieces to the treatment. You decide quickly if tests like x-rays and MRI are in order, if the fitting for a Cam Walker is appropriate, or if PT is necessary sooner than later. You do what you can to drive the pain to 0-2 as fast as possible with arch supports, taping, limiting barefoot, and then you have the patient ice and stretch both the achilles and the plantar fascia. After your patient’s feedback, for me that is on a monthly basis, you begin to make changes in all of the modalities listed below.
 

MRI with normal looking plantar fascia right above my sensor
 
     To tie this into Chapter 3 and 4 on gait and biomechanical examinations, when a patient presents with plantar heel pain problems, the most important examinations to do in 10 minutes (or 20 minutes) are:
  • Signs of Pronation Medial Overload
  • RCSP
  • Equinus with AJDF
  • Functional Hallux Limitus
  • Metatarsal Alignment (Metatarsus Primus Elevatus)
  • Forefoot to Rearfoot (signs of forefoot varus)
  • Antalgic Gait
  • Side to Side Heel Compression Pain
  • Signs of Hard Heel Contact in Gait
 
 
Common Mechanical Changes for Plantar Heel Pain (with the common ones in RED)
  1. OTC and Custom Orthotic Devices
  2. Heel Cushions
  3. Avoid Strong heel strike
  4. Avoid Barefoot
  5. Avoid Zero Drop Shoes
  6. Heeled Shoes
  7. Taping
  8. Achilles Stretching
  9. Plantar Fascial Stretching
  10. Metatarsal Doming and Single Leg Balancing
  11. Limitation of Toe Bend
  12. Physical Therapy Prescription
  13. Cam Walker with or without Crutches in the Immobilization Phase
  14. Plantar Fascial Rest Splints
  15. Plantar Fascia Socks
  16. Slippers with Arch Support
 
     OTC and Custom Orthotic Devices work in many ways to help heel pain. Their mechanical functions vary with all the modifications that can be applied. One of the primary ways is in the mere transference of weight from the painful heel forward into the arch. I like Sole, Pure Stride, or Power Step inserts that can leave my office at the first visit customized with the right arch support, and I typically soften the heel some. I want the inserts protecting the heel and transferring weight to the arch immediately.

Here all the heel hardness has been ground away and replaced with a soft ⅛ inch spenco or poron or neolon pad for extra cushion
 
     Who for and when will I make custom orthotic devices? This will depend on how the patient is progressing with their heel pain, how long they have been dealing with the problem, what their biomechanics are like, and what is their history of possibly biomechanically related problems. If the person on top of this foot with plantar heel pain, who may have only had the problem for a few weeks, but has terrible biomechanics, or long standing biomechanical issues that I can help, we will begin to have a discussion at their first or second visit with me. If the patient’s problem seems related to heel strike only or predominantly, I will consider soft based memory foam Hannafords as my initial custom orthotic device. If their problem seems more related to pronation issues, that a plastic insert will work fine with, I will move into the myriad of orthotic devices that help pronation.
     So why are OTC or custom made orthotic devices useful in plantar heel pain? For any individual patient it may be impossible to exactly sort out, but you are trying to affect the following: transfer the weight from the sore heel to the arch (you can see that heel controlling orthotic devices like Inverted or Kirby may not be appropriate in acute heel pain situations), decrease the pull of the plantar fascia on the heel bone, take tension off of the Achilles’ tendon fibers that run into the plantar fascia with some heel lift and heel centering towards neutral), and free up the plantar fascial tension at heel lift by eliminating functional hallux limitus when present. Occasionally I have to remove the extrinsic heel post when there is acute heel pain due to the accumulation of stress on the heel itself caused by the heel post (which may later be put back).
 
     Heel Cushions come in many sizes and shapes, made of foams, gels, low durometer EVAs, etc. Their mechanical function is to soften the heel, and sometimes transfer weight forward off the heel. The goal of all of these is to soften the heel at impact, decreasing the pain. I always experiment with patients with heel pain if they can tolerate heel cushions or not (it is something you should have stocked in your office). I have a range from very spongy to somewhat firm. Heel cushions also act as heel lifts transferring weight forward ideally, and easing the tension off the Achilles’ tendon attachment onto the heel.


Here is a hybrid heel cushion which can both cushion and stabilize by decreasing any heel motion
 
Practical Biomechanics Question #313: With plantar heel pain, what are the two main functions of an arch support (OTC and custom)?
 
     Avoidance of Strong Heel Strike Gait Pattern is another common tool to help heel pain. Its mechanical function is to decrease the stress on the plantar heel. Many patients are strong heel strikers, you can hear them coming, and when they get heel pain, it is a pattern to try to change. You probably will not notice this until well into your treatment when they start walking normally again if they had an acute injury. With running, I can typically get a heel striker to be a full foot striker with some coaching. Try to learn the concept of Chi Running. With walking, it can be very hard, and I usually rely on physical therapists trained in gait to help.

Over Striding is a Common Cause of Excessive Heel Strike that can be helped in coaching
 
     Avoidance of Barefoot is one of the gold standards of plantar heel pain. Its mechanical function is to dampen the stresses through the heel with a layer of material between the heel and the ground. Whatever the cause of the heel pain, going barefoot can keep the heel irritated and not allow healing to occur. Patients with chronic heel pain are very frustrated by the permanence of never going barefoot again. However, as the symptoms calm down, you can initiate flat footed barefoot foot walking, especially on the stairs at home. For awhile, many of my patients wear Oofos sandals as a house slipper for cushion, or even an indoor only athletic shoe with orthotic devices. The podiatrist must ascertain if this is needed based on the amount of barefoot they do, and the aggravation of symptoms produced.
 
     Avoidance of Zero Drop Shoes can only be a general guideline, but the faster you walk, a slight heel is important. Its mechanical function is to prevent overstretching of the achilles at contact, and over stretching the plantar fascia at push off. Zero Drop shoes are all the rage now, but they make the wearer actually more flat footed, staying more on their heels, and then harder to move forward. There is more tension on the plantar fascia and intrinsic muscles as they lift their heels. Many times I have had to use orthotic devices with heel lifts to neutralize this effect on the heel.
 
     Heeled Shoes or Boots are the opposite, at times, of going barefoot or wearing zero drop shoes. Their mechanical function is to transfer weight forward from the heel and decrease tension on the achilles tendon. Here you are trying to use a heel to shift body weight forward enough to take the pressure off of the heel area. Unfortunately, with some heeled shoes, the force is placed too much on the heel, and the heel pain increases (especially with spiked heels!) It is not the softness of the heel that matters in this regard, since Dansko clogs with their hard wooden base is the poster child for this process.
 
Practical Biomechanics Question #314: What are the pros and cons of a heeled shoe with plantar heel pain?
 
     Taping is another gold standard in the treatment of plantar heel pain. Its mechanical function is in reducing the stress on the tissue that attaches into the heel. It is also the basis of how podiatrists decide if someone should get orthotic devices based on a negative or positive response. This practice is from the early days of biomechanics and should be abolished for there are so many reasons you are utilizing orthotic devices differently than how a specific tape works. I use only two types of taping routinely for heel pain: low dye taping and Quick Tape by supportthefoot.com. In fact, Quick Tape is used first, and if it doesn’t work, and only if it doesn’t work, I begin the process of trying the many versions of low dye until I find the best version.
 
Quick tape can stay on for 5-7 days so ideal for backpacking trips, or in the transition from a cam walker into normal activities
 
     Achilles Stretching is another gold standard for plantar heel pain. Its mechanical function is to decrease the stress on the arch structures attaching into the heel. The less achilles tightness, the less strain on the arch, and plantar fascia, in fact the entire foot. I have always considered plantar fasciitis as an inflexibility issue with the achilles and plantar fascia. At times, plantar heel pain is a problem of plantar fascial inflexibility especially with hallux limitus or pes cavus. At times, it is a problem of achilles inflexibility with tightness in the gastrocnemius, soleus, both, or only one. The ability to measure the Achilles’ tendon reliably should be an important tool (described in both Book 1 and chapter 4 of Book 2 here)
 
Plantar Fascial Wall Stretch with toes bent, heel on the ground, and knee driven towards the wall..
 
     Plantar Fascia Stretching is another gold standard for plantar heel pain. Its mechanical function may be in stretching the tissue around it more than the fascia itself. You are attempting to loosen up the fascial bands with gentle non painful stretches. I love the Plantar Fascia Wall Lean Stretch, and the rolling ice stretch with a frozen sports bottle, but have mixed feelings about the Graston technique used by physical therapists. Part of the problem is that loose tissue can feel tight with nerve hyper innervation due to pain, or swelling may make loose tissue feel tight, or muscle fatigue may make the tissue feel tight. There are some many false positives in muscle or fascia tightness, that I do not think we know this process very well. I prefer simple plantar fascial wall leans or rolling sports bottle stretches to gently pull on this very inelastic structure.
 
Practical Biomechanics Question #315: Plantar Fascia is a ligament, and ligaments are almost impossible to stretch, so why does this stretch work so well?
 
     Metatarsal Doming and Single Leg Balancing have been discussed at length in this chapter and are crucial to take the strain off the plantar fascia. Their mechanical function is in strengthening the injured tissue. As a reminder, the plantar fascia is the third most important structure for arch support. The most important is the ligaments holding the bones together, the second most important is the intrinsic and extrinsic muscles, and the third most important is the plantar fascia. Every 10-20% stronger that I can make the intrinsic muscles, I am taking a tremendous load off the plantar fascia. Metatarsal doming and Single Leg Balancing are the best, and safest, ways to strengthen those intrinsic muscles.
 
     Limitation of Toe Bend has developed in my practice due to MRI images. Its mechanical function  is in reducing the stress on the plantar fascia. So many patients, with chronic heel pain, had degenerative changes seen only on MRI. I placed them on a three month program of no toe bending (with Hoka One One shoes, spica taping, Cam Walkers, Carbon Graphite foot beds, or Bike shoes with embedded cleats) and they did well.
 
Bike Shoes with embedded cleats are successfully used to rest the plantar fascia by limiting big toe joint bend
 
Practical Biomechanics Question #316: What are five common ways to restrict big toe joint motion of dorsiflexion?
 
The plantar fascia should be dark black all the way back to the heel bone. This MRI shows a 2 inch section of fascia irregularities from the heel bone forward. Treatment is helped with limiting big toe joint motion for a few months.
 
     Physical Therapy is very common for my patients with plantar fasciitis. I typically write a specific prescription for 8 sessions to start. Its mechanical functions are strengthening, stretching, mobilizing, and activity modification stress reduction and modulations.  But, what mechanical help am I prescribing? Of course, physical therapy will always include anti-inflammatory measures, but the four main aspects I ask a physical therapist to help with are achilles and plantar fascia flexibility, foot and overall leg strength, cross training guidelines for the patient, and gait training for the heel strikers.
 
     Cam Walker with and without Crutches for the Immobilization Phase is something you should not forget about. Its mechanical treatment is in complete rest of the plantar fascia when it needs to be immobilized from a tear or symptoms consistently over the 0-2 level. Plantar Fasciitis treatment has to undergo the same criteria of treatment as all other injuries. You must create that 0-2 pain level, and keep it there during the entire rehabilitative course. Sometimes, before an MRI is done, there can be stress fractures or even plantar fascia tearing, that only the Cam Walker can bring the pain down. Many patients get 4 hours a day in their Cam Walkers with EvenUps on the other side just as a means to cool down their injuries as we create a healing environment.
 
Practical Biomechanics Question #317: Any injury that is so common can tend to be subject to protocols. Protocols do not individualize, so patients can continue to hurt themselves. What pain level is crucial to maintain in injury rehabilitation that almost guarantees great healing?
 
     Plantar Fascia Rest Splints have dominated the landscape over the last 25 years, and now the DeHeer Equinus Brace, which crosses the knee joint, may be a better mousetrap. Their mechanical function is to put a long grade by consistent stretch on the injured tissue. At present, I have limited feedback on the DeHeer, but since it crosses the knee joint, if the knee joint can take the stress, it should work well. All of the plantar fascia braces do produce some relaxation to the tissues, and I think that a patient who has several months of pain (especially in the morning), should begin to wear during the day when they are at rest. It can be an hour at a time throughout the day (while they are working at their desk, eating meals, watching movies, etc.) If the morning soreness is more than a couple of minutes, and if they seem to be tolerating it during the day, they can try sleeping with it. Sleeping is always the best time to heal, so disrupting that sleep at all, should be well thought out if needed.
 
Classic Plantar Fascia Night Splint with adjustable straps to pull the foot into more dorsiflexion if needed. I rarely feel a need to use these straps at all.
 
     Plantar Fascia Socks are a helpful support, under the regular socks, and routinely sold at athletic stores.
 
     Slippers with Arch Supports, like Teva or Vionic, have been a great help to heel pain sufferers. They can be at the side of your bed when you get up in the middle of the night. For many patients who do not wear shoes in the house, a house-only slipper or sandal, that cushions and supports has been a wonderful compromise. 

Monday, October 17, 2022

Morton's Neuroma: Excerpt from Book 2 of Practical Biomechanics for the Podiatrist


The following is an excerpt from my book on Practical Biomechanics for the Podiatrist. 

https://store.bookbaby.com/book/practical-biomechanics-for-the-podiatrist1
 
4d9db4bd6d8b7d9451f9b5a5e60cb235.png
Schematic of Morton’s Neuroma
 

     The basic mechanics of Morton’s Neuroma formation is pretty common knowledge. The junction of the medial plantar and lateral plantar nerves come together between the third and fourth metatarsals possibly making this nerve thicker or more sensitive. The motion of the 3rd metatarsal which articulates with the 4th metatarsal, and the motion of the 4th metatarsal which articulates with the cuboid, can be different enough that the intermetatarsal nerve branch can get irritated with the independent motion of the 3rd and 4th metatarsals. The overall motion of pronation always increases the metatarsal motion adding to the possibility of Morton’s Neuroma pain. If the nerve is already hypersensitive from low back issues or piriformis syndrome, or excessive pronation at the ankle with bowstringing of the posterior tibial nerve at the medial malleolus, or traction from over strengthening of the popliteal nerve with hyperextension of the knee, etc, then the pain can come on easily and with more disability. Morton’s neuroma pain, along with low back issues, etc, is called double crush syndrome. I have patients where triple and quadruple crush were in play with their presenting nerve pain. It is so common to have L4/L5 nerve root issues that cause pain around the 3rd intermetatarsal space with or without a neuroma. You always have to treat the foot, but you always have to be aware that nerves are superhighways to the brain. They get irritated anywhere along the chain from the foot to the skull, and nerve pain can be the worst pain people have to deal with. The opioid epidemic is one aspect that gives us perspective into this complex problem, because with bad nerve pain, patients many times feel they have no other choice. When the nerve pain starts at the foot, or the foot is just part of the picture, it is so important to be successful in treating each area. I tell my patients that the two things I hate the most as a podiatrist are nerve pain and infections because both are treatable, but possibly life changing if I fail.  
     The treatment of Morton’s Neuroma pain must always be 5 pronged (even though we are just focusing on the mechanics in this book): mechanical, inflammatory, neurological, diagnostic, and as a team (physiatrists, neurologists, pain specialists, etc.). The last point on nerve issues that I want to make is that nerve problems present in one of 3 ways: numbness, numbness and pain, or just pain. These 3 presentations are the same process that responds to treatments the same, even though patients respond and react to these 3 situations differently. The treating doctor should respond and treat them the same.

 
dee44a50ce5dd2c42273a6876b99378f.png
Schematic of how foot pain can be caused or heightened in intensity by back problems

 https://youtu.be/E0E60NpOSHg   Nerve Pain Video 

     To tie this into Chapter 3 and 4 on gait and biomechanical examinations, when a patient presents with Morton’s neuroma symptoms, the most important examinations to do in 10 minutes (or 20 minutes) are:

  • Gait Findings of Pronation
  • Gait Findings of Limb Length Discrepancy that puts stress on low back
  • Gait Findings of Knee Hyperextension
  • Forefoot to Rearfoot Alignment
  • Metatarsal Alignment
  • Ankle Joint Dorsiflexion for equinus forces to be reversed
          Other Special Tests
         
  • Straight Leg Test for sciatica
  • Tinel’s Test for Tarsal Tunnel Syndrome
  • Wide Feet (or at least wider than shoes)
 

Common Mechanical Changes for Morton’s Neuroma/Neuritis (with the common ones utilized in RED)
  1.  Metatarsal Padding
  1. Orthotic Devices emphasizing Metatarsal Support
  1. Forefoot Off Weighting
  1. Soft Tissue Mobilization
  1. Toe Separators
  1. Buddy Taping
  1. Neural Flossing
  1. Metatarsal Doming
  1. Standing Strengthening Exercises
  1. Rocker Shoes, Carbon Plates, Bike Shoes with Embedded Cleats
  1. Budin Splints
  1. Sciatic Nerve Advice
  1. Skip Lacing
  1. Wide Shoes
 

     Metatarsal Padding for support of the metatarsals will stabilize the area and separate the metatarsals so the nerves do get irritated. Its mechanical function is to off weight the sore area, separate the metatarsals for less nerve entrapment (spreading the metatarsals), and transfer weight more proximal back towards the heel when standing. This is explained in the metatarsalgia section above. The main difference over metatarsalgia is that nerves probably can take a little less pressure initially then if there were no nerves involved, and then get used to more, and the placement may be slightly more medial for metatarsalgia. The nerves can be so red hot that they can not take any pressure, and this indicates they need a lot of nerve treatments at this point: orals and topicals, neural flossing, local and spinal injections, etc.
 
Practical Biomechanics Question #245: Nerves can be both helped and irritated by metatarsal pads. Since classic Morton’s neuromas usually love metatarsal pads, what would it indicate in terms of treatment direction if the metatarsal pads proved very irritative and intolerable?
 

2973e369c0580cd035b024a98897249d.png
Classic Longitudinal Metatarsal Pads for Morton’s Neuroma Pain (Hapad, Inc)
 

     Orthotic Devices emphasizing Metatarsal Support was also discussed in the metatarsalgia section. Its mechanical function is to off weight the sore area, support proximally, spread out the metatarsals to decrease entrapment, shift the weight more proximal while standing, and immobilize the foot somewhat for less motion. Certain feet, if supported well, will give the patient wonderful metatarsal support (like most pes cavus foot types). I find the classic Root Balance technique to be great in general for its emphasis on metatarsal support. Any orthotic laboratory should be able to give you advice on corrections to the impressions that will maximize the metatarsal support, the same as giving advice on corrections for lateral arch stability or medial arch stability. With Morton’s Neuromas, we want to maximize the intrinsic metatarsal support the impression can give us, and when needed, begin to add additional extrinsic metatarsal padding. This improved metatarsal support, especially when it is intrinsically applied, can make an incredible difference in support of the tissues involved. Support means stability or immobilization of the sore tissue.
     This all sounds nice, and is true, but the crowding of the shoe caused by an orthotic device and its added pads, etc, may not be tolerated in most shoes. For each patient, one variable may prove the most important for both helping and producing distress. I have had to abandon more shoes due to Morton’s neuroma conditions than any other problem.

 
525b498bf6a2df6e2910edeb01ce63c4.png
Crazy Shoe Searches with Neuroma Pain

     Forefoot Off Weighting is initially applied with ⅛ inch adhesive felt, and then other types of glued material like Spenco, poron, or grinding rubber, to make it more permanent once the correct position for maximum pain relief. Its mechanical function is to off weight the sore area. For most cases of Morton’s neuromas, this will be under the 1st and 2nd metatarsal heads, and the 5th and somewhat 4th metatarsal heads. The process is started at the first visit with the adhesive felt. The patient is given more material with instructions to experiment. Occasionally the position that brings the most relief is not anticipated. If you can find the most sensitive spot plantarly, you can mark it with lipstick and have the patient transfer that spot onto the top of any surface to find the exact spot to float (off weight). When patients present to my office with previous orthotic devices, I always do this to make sure the accommodations are really in the correct spot, which they normally are not. Millimeters count here.

 
289c685a24bcbe6ffaccc37691af9902.png

This patient with Morton’s Neuroma pain felt relief with this combination of metatarsal pads, off weight pads, and full length pads
 

Practical Biomechanics Question #246: Due to the fact that Morton’s Neuromas do not like tight shoes, every pad must be carefully tested for both positive and negative results. What are some options to help patients when the shoe and insert combination are helpful, but after hours of wear the neuroma starts to hurt due to the crowding?
 
     Soft Tissue Mobilization is an incredible help in releasing trapped nerves. Its mechanical function is to improve soft tissue mobility for less nerve entrapment. I apologize for forgetting the name of the podiatrist that initially turned me on to this twenty five years ago for I owe him a thank you. I not only have patients do self mobilization three times a day with topical nerve creams, like Neuro-Eze or Neuro-One (both L-Arginine based), with the goal to move the metatarsals around, but a prescription for physical therapy for soft tissue mobilization is typically given for 8 visits. At the same time, I have the therapist advise the patient on a sciatic nerve program and teach neural flossing or gliding. Also, instructions for the TENS unit daily program are occasionally given to the therapist.
 
Practical Biomechanics Question #247: How does foot rigidity cause or aggravate Morton’s Neuroma pain?


d73594f07704037567a4649467bfb3e3.png
Soft Mobilization can be with a professional or self directed


Toe Separators are a simple, but sometimes very powerful, tool to change the biomechanics of nerve irritation. Its mechanical function is to change the dynamics of the nerve pressures. There are very thin wafer-like toe separators, but I prefer the normal small gel hourglass shaped ones. Since Morton’s Neuromas are typically between the 3rd and 4th metatarsals, these toe separators are placed between the 3rd and 4th toes. It seems like 50% of patients think it is helpful. This was taught to me by Dr. Remy Ardizzone.

 
     Buddy Taping of either the 2nd and 3rd toes, or the 3rd and 4th toes, when there was Morton Neuroma pain, seems to work the 50% of the time that toe separators do not. Its mechanical function is light immobilization of the tissues involved. I typically use 1 inch wide Coban or Coflex which sticks to itself and not the skin.


24057942df1e08b871a0e798065bae7b.png
Here the 3rd and 4th toes are Buddy Taped 


     Neural Flossing or Gliding is a way to stretch and relax the sciatic nerve as it comes off the back, through the piriformis, down the hamstrings, splitting behind the knee to go into the back of the calf and side of the lower leg, and finally onto the top and bottom of the foot. Its mechanical function is to gently floss the nerve making sure that there is no swelling or scar adhesions. There are many variations. Some of the variations will excite the nerve more, and some will work better on the peroneal nerve or the posterior tibial nerve. The standard floss is where the patient lies on their back with the resting leg bent at the knee and the foot flat on the ground or yoga mat. The side to be moved starts where everything is flexed as much as possible (toe dorsiflexed, ankle dorsiflexed, knee flexed and hip flexed without pulling pelvis off the table). Then 10 rhythmical rotations slowly and gently are started from flexed to extended (hip extended, knee extended, ankle plantar flexed, and toes pointed), never stopping at either end of the exercise. Nerves hate prolonged stretches and love motion. Neural Flossing is typically done 3 times a day, on a hard surface since you need to have the pelvis and spine as stable as possible. I will talk in a minute about standard sciatic nerve advice.


b9d497a2b8daa8f90d747cf8fa7f5f37.png

Neural Flossing of the Right Leg with the Stable Leg Side Immoble. Here the right leg is already starting to straighten where the left leg is anchored to the supporting surface.

a3b18b1a33f65264d4431e913ea79b0c.png
 
Neural Flossing of the Right Side starts with the right hip, knee, ankle and toes pulled up, and then gradually these 4 joints are pointed
 

Practical Biomechanics Question #248: Neural Flossing is 10 slow flexions and extensions. What puts more stress on the sciatic nerve: Knee Straight vs Knee Bent?
 
     Metatarsal Doming was previously discussed in the big toe joint section. Its mechanical function here is to make the foot more stable taking stress off the nerves.


f73d0f0ee13d9763d0cd6ad74c505533.png
Metatarsal Doming is an Isometric with 6 second contraction 4 second relax
 

     Standing Strengthening Exercises, along with metatarsal doming, will help keep the injured tissue strong. Its mechanical function is to increase stability by strength. We have to avoid toe bend exercises due to the location of the pain (like heel raises, planks, downward dogs, etc.), but the many versions of Single Leg Balancing, and standing poses in Yoga, Chi Gong, and Tai Chi are a wonderful way to maintain strength which avoid toe bending. Other modifications can be done to cardio workouts like staying flat footed while doing the elliptical, or having the pedal in the arch or heel on a stationary bike.


233cbd6816599a6897101a9554c35d6a.png
Single Leg Balancing to help develop Intrinsic Foot Strength
 

     Rocker Shoes have been previously discussed in the big toe joint section. You probably should also consider Bike Shoes with Embedded Cleats and Carbon Plates when immobilization seems necessary to bring the pain down between 0-2.


77dae1aacaa46f909cf9553b76449c58.png
Hoka One One Rocker Shoes

     Budin Splints were previously discussed in the hammertoe section. Its mechanical function is to immobilize the motion of the local nerves. For Morton’s Neuromas, they change the biomechanics of the stresses in the area. Typically I use a Single Loop Budin Splint (also called hammer toe regulator) and get equal results by buddy taping 2 and 3 or 3 and 4 with Coban tape. In several cases of Morton’s Neuroma with a really sore 3rd toe, the patients may find the biggest relief over the 2nd toe only, over the 4th toe only, or getting a double loop for the 2nd and 4th toes combined. This is a way to indirectly immobilize the local nerve. Budin Splints are primarily immobilizing the metatarsal phalangeal joints, and you can add metatarsal padding to the bottom of the splint to off weight the sore areas also.


cc1328056f08e8e1e1b397c57248c573.png

Here a Budin Splint is placed over the 3rd toe for Morton’s Neuroma pain with a small Hapad metatarsal pad. This is ideal for using the previously discussed lipstick marked on the sore spot to find the exact location of the pad
 

     Sciatic Nerve Advice is needed for any nerve condition you treat including Morton’s Neuromas. Its mechanical function is to find ways to decrease the stress on the nerve like various positions. Nerve irritation affecting the foot can come from anywhere. The nerve can be irritated from the exhausting long hours the patient sits. The nerve can be irritated from a bad mattress. The nerves can be irritated by the lifting or torqueing at their jobs. A simple prescription to a physical therapist for a sciatic nerve program should be all you need. However, tests including straight leg, Tinels, intermetatarsal nerve sensitivity on exam, can be retested for improvement evaluation, and point to how high the nerve tension is on the body. I try to discuss what is nerve sensitivity with the patient, so they know what to report. Nerves can hurt for sure, but also give symptoms of burning, itching, buzzing, tingling, prickling, sharp stabs, and numbness. I want to know where and when they have any other nerve symptoms called dyskinesias, even if it is the upper extremity, since I am looking for patterns or overall neural tension in the body. We all know that we must bend our knees when we are picking up something. The worst stretch on the sciatic nerve is when the ankle is bent (dorsiflexed), the knee is straight, and the hips are bent forward. Even having 2 of these together can be a problem, especially straight knees and dorsiflexed ankles. What position are we in when lowering our heels off a stair? Or doing the downward dog? These are positional questions you expect a good physical therapist to know and change as they evaluate a patient’s routine.
     This is a good time to remind the reader that Physical Therapists do have a subspecialty in nerves. There is an Academy of Neurologic Physical Therapists. Have your patients with nerve pain see if various offices have therapists specializing in the nervous system.
 
Practical Biomechanics Question #249: Nerve pain, like that of Morton’s Neuroma, has many mechanical treatments. Name 4 mechanical treatments for intermetatarsal nerve pain.
 
     Skip Lacing is a common way to take pressure off an area, even when the pain seems all plantar. Its mechanical function is to decrease compression across the sore area. Nerves hate compression. Typically I will remove the lacing from the distal eyelet,  but occasionally two. 

 
8e61b9ecfb99aaea37f2e0ad05b9d347.png

2 eyelets are removed to reduce pressure temporarily across the metatarsophalangeal joints


Wide Shoes really produce the same effect as the skip lacing. Its mechanical function is to prevent medial to lateral compression forces on the intermetatarsal nerves. New Balance was the first company for me that really helped with their variety of shoe widths. Now other companies at least have several widths per size. Then there are shoes that just run wide like Keen, Lems, Altra, etc.


Practical Biomechanics Question #250: Any foot nerve pain should be assumed that the symptoms are at least partially coming from higher up the chain. If a patient presents with Morton’s Neuroma pain, but presents with numbness on the top front half of their foot, where does some (or all) of the problem arise from?


     I will close with a copy of my Nerve Pain Algorithm for treatment options for peripheral neuropathy, Morton's Neuromas, Tarsal Tunnel, Baxter's Nerve Entrapment, etc


Wednesday, September 28, 2022

Practical Biomechanics for the Podiatrist: Book 2 is out in Print

https://store.bookbaby.com/book/practical-biomechanics-for-the-podiatrist1


     I am so excited to have finished my second book of this series entitled: Practical Biomechanics for the Podiatrist. This book covers examination techniques very helpful and most of the mechanical treatments for foot injuries. It is probably the most practical book I have written and perhaps a great Christmas present for your favorite podiatrist. LOL I think all my patients would be helped by seeing all the options for their foot injuries and of course so many injuries have 3 or 4 problems going on at the same time. Rich