Common Non-Surgical Treatments for a Painful First MPJ
By Richard L Blake DPM MS
The
first metatarsophalangeal joint is a fascinating area to treat because of all
the variables involved. Since the end of normal stance in the gait cycle ends
with pushing off the hallux with first metatarsal plantar flexion, we can have
a difficult assignment. Patients with chronic big toe joint pain (including
sesamoid problems, hallux rigidus, or chronic turf toe) may need multiple
orthotic devices with modifications and accessories. Why do orthotic devices
not work for these problems at times? Varus corrected orthotic devices work for
some people to shift the body’s weight more lateral, but the higher the arch
you make, the more plantar flexed the first metatarsal becomes, which can force
the first MTPJ further into the ground and become further bent, worsening the
pain. Therefore, where some custom orthotic devices (even an orthotic device
made expertly for a pes cavus foot type) may work sometimes, other times you
have to make a flatter arched orthotic device or no orthotic device at all.
Below we will talk about various mechanical changes to help big toe joint pain
in various stages and injury (from subacute to chronic to maintenance). I
commonly think of pain in the big toe joint coming from excessive ground
pressure, too much bend, malalignment with valgus forces, superficial pressure
from shoe gear, compression forces across the joint, or a combination of some
or all of these forces. To affect many of these causes, you have to direct
treatment towards the propulsive phase of gait. Below are several strategies,
(amongst many more!) that I hope will help you think outside your normal
routine in creating a stable joint and improving pain.

Of
course, it may be the left non bunion side that hurts
Immobilization Techniques
Spica taping helps restrict 1st MTPJ
dorsiflexion. It is commonly learned with KT tape or Rock Tape since it goes
around the bends of the toe easily. If the patient needs more restriction, and
has the basic skill down, then 3M Nexcare Waterproof Tape is used. Typically
one inch wide tape 7 to 8 inches long is centered dorsally over the top of the
hallux. First the medial leg is brought down under the big toe joint and then
runs under the first metatarsal. Then, the lateral leg is brought down under
the big toe joint, and then runs parallel to the first strip along the same orientation
of the first metatarsal. At least one half of the lateral leg should be
touching the skin so that the tape can last 3-4 days. Rub the finished product
to activate the glue of KT or Rock Tape for one minute. The big toe itself when
you are finished should be just slightly below the 2nd toe. Spica taping is
classic for hallux rigidus and turf toe, but can distribute the weight bearing
forces away from the sesamoid for sesamoiditis or fractures as well. Spica
taping can increase the compressive forces across the joint, which may hurt, so
this may not work for all patients. https://youtu.be/l_4HESXCG40

Spica Taping with paper tape to secure
some loosened edges
Bunion taping is a technique done the same as the
Spica taping except with different starting point and leg orientation. Done
with the same tape as Spica taping, the center is placed on the lateral side of
the hallux with one arm going superiorly and one leg inferiorly. When applied,
the hallux is placed in neutral and first the plantar arm comes under the big
toe joint and laid along the medial side of the first metatarsal. This is where
you, and ultimately the patient, has to play with how tight to make it,
balancing correction and too much pressure. The superior arm then comes across
the joint and again is laid down on the medial side of the first metatarsal
with about half touching new skin and half overlapping the other arm. This
technique not only centers the joint, but also restricts some joint motion.
Again, one minute of massage helps activate the glue. https://youtu.be/uD348O7pKwo
Accessories
Toe Separators/spreaders come in various shapes and sizes and
materials. A medium gel toe separator that has the shape of an hour glass is
conservative bunion care 101. Foam toe separators have more width and therefore
work better for a lot of my patients. They can, however, be too long and cause
ingrown toenails, but you can simply shorten them with a scissor. With
overlapping toes, you either need the hour glass shape of the gel ones, or the
toe separator that slips over the 2nd toe (or 1st and 2nd
toes) and has a toe separator attached medially to the second toe, taking care
it doesn’t migrate and sit under the 2nd toe, potentially worsening a
hammertoe. My mantra in bunion care is to maintain stage 2. The toe separator
immediately puts the bunion, which may have started the day in stage 3 or 4,
back into stage 2. As you walk, the forces through the big toe joint are more
normal and should slow down the retrograde forces. This centering of the joint
will allow for normal muscle development and strengthening, as well as help
alleviate pain from lateral joint impingement. Toe separators can and should be
used after bunion surgery, if no second hammertoe surgery was done, to help
maintain the correction while the muscles and scar tissue are transforming.

Carbon Plates with Morton’s
Extension work
well with an orthotic device on top. Here only the first metatarsal head and
hallux have the carbon plate distally. You want a Varus biased orthotic device
that gets you into the middle of the foot well. However, with some severely
pronated feet, this can be a great challenge. If you can get the weight more
central, this device works well allowing normal motion without big toe bend and
it is appropriate to only use on the symptomatic side. A common problem with
this design is when the hallux is too far lateral and falls off of the plate.
Sometimes you have to use bunion taping (as previously described) and/or toe
separators (also previously described) to get the hallux over the Morton’s
extension. And again, if the patient pronates too severely into the Morton’s
extension, the pressure can be too much, and may be more a candidate for the
next design.
https://jmsplastics.com/product/nrg-plates/

Correct Toes invented by Oregon podiatrist Dr.
Ray McClanahan, slips over each toe, gently separating them, and were designed
to use for walking and running. Since Correct Toes will place each toe in a much
separated position from each other, there are only a select group of shoes that
they will fit into. I tell my patients to look at the list on the following
website, also start with walking around the house in loose slippers to get the
feel of them. Altra, Keen, and Lems shoes are my go-to shoes right now known
for their wide forefoot. Some patients have too narrow a foot for the current
design, so I often remove the area lateral to the 3rd or 4th
toes and they are still getting the benefit of the separation of the 1st, 2nd,
and 3rd toes. Even if the patient wears them for a short time at home, they
will get a benefit from them and many have described a greater sense of power
at push off. https://www.correcttoes.com/
Orthotic Modifications

Dancer’s padding/reverse Morton’s
extension is
a ⅛ inch or ¼ inch pad that typically goes under the second through fifth
metatarsal (1). If the fifth metatarsal has symptoms, then place it only under
the second through fourth metatarsals. It can be applied to anything (orthotic
device, shoe insert, sandal, ballet slipper, bare foot, etc.). If you increase
the padding to ¼ inch, make sure the patient does not feel that they are
“falling into a hole” which would make things worse. You can also offset the
second pad a little laterally and proximally (or distally) which helps
transition the edges (if you are layering 1/8 inch pads like adhesive felt).
This pad typically reduces the plantar pressures across the joint by 50% or
more, however, many times the pronation effect of the dancer’s pad must be
balanced by an arch support to pull the patient laterally at the midfoot. I
prefer OTC non plastic orthotic devices for this since the goal of plastic
based orthotic devices is meant to increase 1st MTPJ motion. It may just not be
the right time in the rehabilitation for a custom plastic device (Return to
Activity Phase) when you are trying to off load a sore sesamoid or painful hallux
rigidus (Immobilization Phase). I recommend Dr. Jill’s Gel Dancer’s Pads to
every one of my patients with big toe joint pain. https://drjillsfootpads.com/retail/ They come in ⅛ inch and ¼ inch, and
sometimes you need to make the hole bigger, depending on the patient’s problem.
They stick on one side, which allows you to place it directly on skin or on an
orthotic device or shoe insert, and are primarily for sesamoid injuries. You
typically only need to place it on the affected side, unless you are using ¼
inch, which you should use a ⅛ inch on the contralateral side for balance.

Cluffy wedges were designed by Dr. James Clough
(play off his last name) in Oregon (2). It is a small pad that fits into the
sulcus under the proximal phalanx to offload the sesamoids as your weight rolls
forward. The ⅛ inch adhesive felt is usually 1 inch by 1 inch or slightly
smaller. It cannot go under the distal phalanx or it will increase 1st MTPJ
dorsiflexion. I never used it until 10 years ago when a patient of Dr. Clough
moved to San Francisco and needed a new podiatrist. She was wearing her cluffy
wedge as part of a fractured sesamoid treatment. When I asked her if it was
helpful, she stated she would not leave home without it. So, it became part of
my treatment from that point on, and like most of these mechanical treatments,
50% of patients feel that it is very helpful. So, when patients present with
1st MTPJ pain on their first visit to my office, they all leave with three
mechanical changes to begin to manipulate the symptoms: spica taping, dancer’s
padding, and cluffy wedges.
No Heel Lifts is the general principle in treating
any metatarsal problem (3). It can be a challenge when the heel lift is for a
short leg which just happens to be on the side of the big toe joint problem.
This can be remedied by making the lift into sulcus length with a cutout for
the big toe joint (lift with dancer’s pad combined). A patient with an orthotic
with a rearfoot post for increased stability can also act as a heel lift. This
can be remedied by removing the rearfoot post and placing midfoot medial and
lateral supports to hold correction. I using the rubber cork from JMS Plastics ¼
inch in the medial arch and ⅛ inch under the cuboid/5th metatarsal base. If the
heel lifts are for Achilles tendonitis, then you have to decide what the worst
pain is for now and make the appropriate adjustments. Lastly, patients should
of course avoid shoes that have any heel for often longer than it takes for the
1st MTPJ pain to resolve (typically an extra month).
The side note to this is that flat shoes
with no lift in the heel can make it harder and more stressful to push off.
Typically, the no heel lift rule works for standing long hours since the weight
gets back into your heels more. But, if flat shoes are painful to push off when
walking and/or running, try to combine a small heel (even ¼ inch can help) with
some good forefoot cushion and flexibility.
Shoe Variations
Rocker Shoes have been popularized by the Hoka
One One shoe company and are a must try for my 1st MTPJ pain patients (4).
These shoes are much better than the extrinsic rockers we used to ask shoe
cobblers to add to shoes, as these tended to be a tripping hazard for my
patients. The position of the rocker has to be just right to roll the patient
gently across the injury, so your patients should speak to the salespeople
about the 3 common positions for the rockers and what shoes have which one.
Some of the shoes will naturally put a slight Varus bias in the roll which may
help until they break down laterally, which is when patients will need to
replace their shoes. New Balance 928 and the dress shoe line Allegria also have
rocker bottom options. One negative of rocker shoes, however, is that sometimes
the heel is too unstable and can create a negative heel effect, which can be
further damaging for the 1st MTPJ. Rocker shoes do separate the ground from the
foot more than traditional shoes, and elderly patients in particular do have to
be extra careful about tripping.

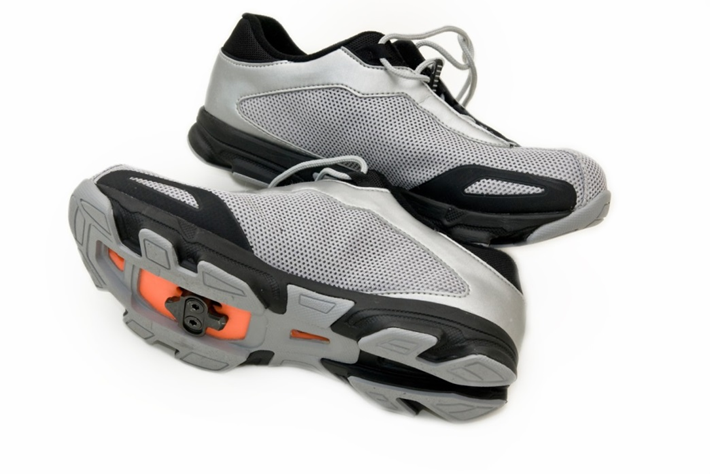
Bike Shoes with embedded cleats have been a wonderful find for my
practice. Chrome, a San Francisco company specializing in bike messenger
apparel, has a line of non-athletic looking bike shoes that can pass as
semi-dress shoes. Other companies like Shimano or Pearl Izumi have mountain
bike shoes, called “hike and bike shoes”. The cleat is embedded so you are not
walking on awkward cleats, and they serve as a very stiff soled shoe. These can
be a much better solution than a CAM walker with an EvenUp on the opposite
side, and are less irritating to people’s backs. The motion in these is
abnormal, using more hip and knee motion since you cannot push off, but since
they are used as a pair the symmetry tends to work well. Even if the patient is
initially in a boot, these shoes or Hoka rocker shoes may be a great transition
before normal shoes. You can also wear your orthotic devices, dancer’s padding,
cluffy wedges, spica taping, etc. with this shoe (as well as with the boot).
Just be careful when wearing outside during the rainy season, as these are more
slippery than regular shoes!
Skip lacing can dramatically take pressure off
the 1st MTPJ. The distal medial hole of the shoe lacing may or may not be over
the big toe joint, but it can still produce pressure downward from the top. You
can skip the medial and lateral last two holes distally, or you can just skip
the medial hole to better maintain shoe stability. First, take out all of the
laces except the most distal. Make sure that the laces are even. Take out only
the lace that runs through the hole near the big toe and transfer it through
the hole one above that is still on the medial side and then through the hole
directly lateral. If you think about it, if you had placed it originally in the
distal medial hole, it then would have ended up here in the second lateral
hole. The original distal lateral lace will also go through the second medial
hole, so two laces through the same hole. From this point on, the lacing is
normal up towards the ankle. This will alleviate pressure from the top down
onto the big toe joint. The link attached has a lot of other fun lacing
variations to try. https://runrepeat.com/top-10-running-shoe-lacing-techniques

Here
the right big toe joint area is skipped
Exercising/Strengthening
Self Mobilization for Hallux Limitus
(5) is a gentle tool that patients can
learn when the range of motion of the big toe joint is limited. The technique
of self mobilization was taught to me by Drs. Rue Tikker and Timothy Shea and
has been a valuable part of my practice for 40 years. The principle of self
mobilization is short, quick motions in directions that are not normal for the
joint to move. So, to improve dorsiflexion or plantarflexion of the big toe
joint, and to break up some scar adhesions, you perform four motions:
- Dorsal and Plantar Gliding
- Side to Side Rotation
- Clockwise and Counter Clockwise
Rotation
- Long Axis Extension
These
are grade 5 mobilization exercises, so are meant to be done with quick
movements. I measure before and after mobilization and typically get a 5,
sometimes 10 degrees gain. The principle of mobilization in this case is to
stabilize the proximal segment (metatarsal) and move the distal segment
(proximal phalanx). So, you stabilize the first metatarsal head so that does
not move, and you grab the proximal phalanx of the hallux. Remember you are
moving the proximal phalanx on the first metatarsal head in 4 ways it does not
normally move. You glide it up and down, you abduct and adduct, you rotate like
a clock in both directions, and you pull it out straight. The patient must do
it 3 to 4 times a day to slowly gain motion, and maintenance for some will be
once a day indefinitely. https://youtu.be/FBTeWbdGrzs
Metatarsal Doming or Arcing is the best way to strengthen the short
flexors (hallucis brevis) along with Single Leg Balancing. Metatarsal doming is
an isometric exercise for a six second count, four second relaxation and then
repeated ten times total, for at least three times a day. While standing or
sitting, the first part of the exercise involves straightening all of the toes.
Keeping your toes reasonably straight, lift the metatarsal heads upwards while keeping
the tips of your toes against the ground as you count to 6. Try to feel the
tension in the metatarsal arch as you squeeze the tissue as you do with every
isometric. That squeeze feel is developing muscle bulk and tone, and patients
begin to feel the difference in their feet within weeks. Once they are doing
the exercise correctly and consistently, they can do it in the supermarket
checkout line, etc, without having to look down. https://youtu.be/GY-mJjXmeIc
No Achilles Tightness is a very important aspect of 1st
MTPJ treatment (6). A tight Achilles’ tendon drives a tremendous force downward
into the metatarsals, which the ground reactive forces have to match. It is why
when we talk about vital measurements, Achilles flexibility is crucial to
learn. When the ankle can't bend past ninety degrees (more subtle forces as the
bend gets closer to 10 degrees) at the middle of mid stance and as the body
weight continues to move forward, the heel will lift up early, the midfoot
collapses, or the foot abducts, all of which drive abnormal pressure into the
forefoot. When you stretch the Achilles’ tendons, both with straight knee and
bent knee positions, the actual stretching itself can put a lot of pressure on
the big toe joint. Instead, you can hang the big toe joint off the end of a
thick book, so as you stretch no weight goes into the big toe joint. You can
also build a well with 4 books arranged to make a float for one spot.
Purchasing a cheap but thick sandal, and then having a shoe cobbler cut out the
big toe area, can help patients avoid irritating their joints while stretching,
etc. https://youtu.be/0eAqJ4-oKTM
References
(1)Cohen, BE. Hallux Sesamoid Disorders. Foot and Ankle Clinics,
2009-03-01, Volume 14, Issue 1, Pages 91-104.
(2)Clough, JG. Functional Hallux Limitus and Lesser-Metatarsal Overload.
J Am Podiatr Med Assoc (2005);95(6):
593-601.
(3)Zhang X and Li B. Influence of in-shoe heel lifts on plantar pressure
and center of pressure in the medial-lateral direction during walking. Gait
Posture. 2014 Apr;39(4):1012-6.
(4)Lin, SY, Su PF, Chung CH, Hsia CC, Chang CH. Stiffness Effects of
Rocker-Soled Shoes: Biomechanical Implications. PloS One. 2017 Jan 3;12(1).
(5)Brantingham JW and Wood TG. Hallux Rigidus. J Chiropr Med. Winter
2002;1(1):31-7
(6)Cazeau C and Stiglitz Y. Effects of Gastrocnemius Tightness on
Forefoot in Gait. Foot and Ankle Clinics, 2014-12-01, Volume 19, Issue 4, Pages
649-657.
No comments:
Post a Comment
Thank you very much for leaving a comment. Due to my time restraints, some comments may not be answered.I will answer questions that I feel will help the community as a whole.. I can only answer medical questions in a general form. No specific answers can be given. Please consult a podiatrist, therapist, orthopedist, or sports medicine physician in your area for specific questions.