Total Pageviews

Translate

Followers

Showing posts with label Power Lacing. Show all posts

Friday, January 6, 2023

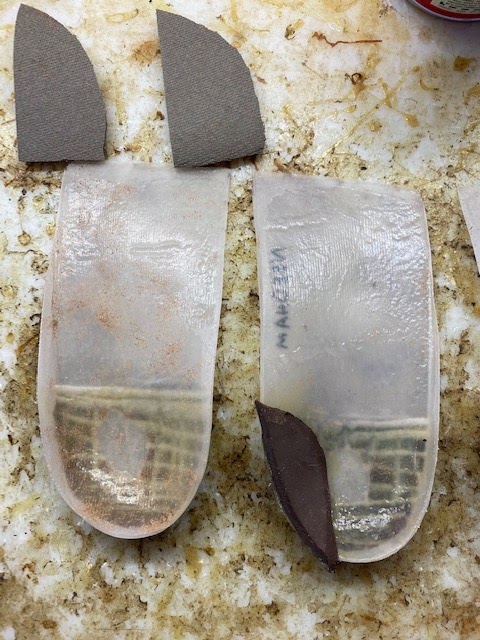
Adding more Support to your Foot Orthotic Device


     So often in clinical practice, we have either designed orthotic devices, or are evaluating previously mad orthotic devices, and we find that the stability could be improved to help the patient. 4 simple improvements are supporting the arch, adding a temporary Kirby skive, changing the shoes to more stable ones, and power lacing those chosen shoes. 


Simple Medial Arch Reinforcement here with 1/4 inch Grinding Rubber


Or, a Temporary Kirby Medial heel skive along to the medial heel cup

     The following is a simple video and discussion on power lacing. 

Thursday, March 5, 2020

Runner's Knot for Increased Stability and Less Heel Slippage

Please start this video at the 3:15 spot to bypass some of the commentary. Power Lacing can be done on almost any shoe and is vital if you wear shoe inserts so that you do not slip out of the heel. This technique, introduced as Power Lacing in the 1980s, when everything was Power Bars, Power Meetings, Power Lunches, etc, the running community gradually changed the name to Stability Lacing or just Runner's Knot. Fantastic to give more stability.

https://youtu.be/a5lUNW9wlpY

Tuesday, February 3, 2015

Power Lacing Question

Hi Dr. Blake,

I just watched your YouTube video on power lacing and I was wondering why you need to skip the 3rd hole?  Is that necessary?  It looks really strange on my shoes because the 3rd hole is actually an extra strip of material, so the strip sticks out when not laced.

Anyways - thanks for your time!  I appreciate it!  

Best,

Dr Blake's response:

     No, you only need to skip the 3rd lace if you do not have enough length to the laces. If you have adequate length, by all means, use all the eyelets. Rich

Friday, November 28, 2014

Power Lacing (AKA Runner's Loop): Amazing Added Support to shoes

Power Lacing was first described to me in a 1980s article in Runner's World. The phrase Power Lacing was coined at that time since Power was the word of the time: Power Plays, Power Meetings, Power Bars, so why not Power Lacing. It has been a significant help to my patients in their attempt to gain stability. 

You need to use the last two eyelets for Power Lacing. If you are short on lacing, skip the third and go out the second hole and back in the first (highest hole). All my patients with orthotic devices should be taught power lacing to prevent heel slippage. 

After the loops are made on each side, the lace is brought through and the laces are tightened. 

This next video shows this and 3 other great lace modifications: Parallel Lacing, Bruised Toe Lacing, and Hot Spot Lacing. 

Saturday, October 30, 2010

Top 100 Biomechanical Guidelines #8: Power Lacing Can Greatly Add to Stability

Power Lacing!! Love Power Lacing!!

One of the greatest modifications for a tie-on shoe is Power Lacing. See the Video Below and the link below to get a real handle on it. It can greatly improve your foot and ankle stability.


Thursday, July 1, 2010

Power Lacing: A Secret to Excellent Shoe Stability


Power Lacing was designed in the 1980's by a runner I believe for better stability while running. It was at a time when everything started with the word Power--power lunchs, power meetings, Power Bars, power walks, etc. Power lacing gives excellent added rearfoot stability making B shoes function like A shoes (using your grammar or high school grading system--I am a teacher at heart), and stability shoes function like motion control shoes. Many of my patients who need cushioned shoes for shock absorption can add orthotic devices and power lacing to get the same benefits of a stability shoe with more shock absorption. I estimate power lacing adds 10 to 20 % more stability for pronation or supination control in most patients in solving their biomechanical problems.
Power lacing is started by identifying the top three eyelets in a shoe. They are numbered for reference with #1 being closest to the achilles tendon (back of the heel). The photo above shows the top 3 eyelets on one side. You always use #1 and #2, and if you have short laces, you can skip #3 entirely.


The photo above shows the third eyelet skipped and eyelets #1 and #2 being used to create the needed dog or rabbit ears.


The photo above shows the side view of the third eyelet being skipped with the dog ears being created for power lacing going into and through #2 and then back into #1.


The photo above shows the above view of the initial power lacing step creating dog or rabbit ears with the #2 and #1 eyelets, skipping the third eyelet.


Following the creation of the dog ears, the lacing from the right side is put through the loop on the left, and the lacing from the left side is put through the loop on the right.


This next step is done with the patient's foot in the shoe. The laces on both sides are tugged equally ( the photo only shows my hand on the left hand side). The tugging or pulling should stay to the outside of the shoe gentlely drawing the sides of the heel counter towards the foot.


The photo above (without the corresponding foot in the shoe) demonstrates how the shoe lacing should look after the tugging is completed. The patient should feel the side of the heel in closer contact with the shoe without the feeling that the circulation is being cut off. By keeping the loops to the sides, not the front of the foot, the patient should not feel that the front of the ankle is too tight. It can take several attempts to get the handle on doing this.


This photo demonstrates another lacing tip that is actually not part of power lacing, but one I teach all the time with power lacing. When you are ready to tie the laces, instead of making one loop and then making the bow, try 2 loops before making the bow. This allows for less loosening of the laces while exercising. It can be very helpful in long distance events, or at least in activities that take a long time to complete.
Good luck with your power lacing!! I hope it helps you.