Ankle Joint
Dorsiflexion Non-Weight Bearing with Subtalar
Neutral
The following is an excerpt from Book 2 of Practical Biomechanics for the Podiatrist
https://store.bookbaby.com/book/practical-biomechanics-for-the-podiatrist1
This is used for Pronation Syndrome, Tight
Muscles, and Weak Muscles. When
pronation is more than expected it could be coming from an equinus source. And,
if you understand the force length curve of the achilles, both the tighter and
the looser the achilles becomes, the weaker it gets. This is my second most
important test.
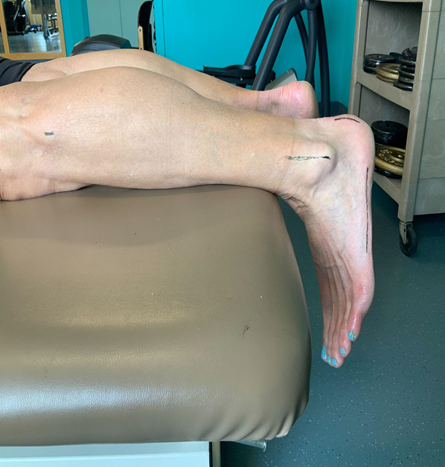
Here are the landmarks from head of
the fibula through the lateral malleolus (stable arm) and then along the
lateral side of the fifth metatarsal
Ankle joint dorsiflexion with the knee
extended and flexed will tell us a lot about the tightness or over flexibility
of the gastrocnemius and the soleus muscles. A tight tendon and an over
flexible tendon are both weak for different physiological reasons concerning
their actin and myosin fibrils. These are the two muscles that make up the
achilles tendon, the strongest and most powerful and possibly the most
influential tendon in the body (definitely influencing the knee, ankle and the
entire foot). Tightness and over flexibility can have severe effects on the
knee, ankle, arch, and metatarsals. They directly affect the ankle and knee
joint (gastrocnemius crosses the knee), but indirectly affect every structure
in the foot. Being able to measure the overall tension in the achilles, and
seeing how it correlates to the normal Achilles force-length curve, is a very
powerful help in so many injuries including all Achilles problems, shin
splints, all ankle problems, all calf problems, all foot problems, etc. It is
probably influential in most lower extremity injuries to at least some degree when
either too tight or too loose.
Achilles’ tendon flexibility measurement
(called ankle joint dorsiflexion) is done along the lateral side of the foot
and leg. One arm of a measuring device (called goniometers or tractographs) is
aligned straight through the lateral plantar foot and the fifth metatarsal
head, and one arm is aligned through the lateral malleolus to the head of the
fibula. You can also attempt to separate the rearfoot from the forefoot for
forefoot equinus evaluations. You then grab the foot and slightly supinate the
subtalar joint by putting medial and upwards pressure on the first metatarsal.
You must maintain that subtalar joint position while you ask the patient to
help you pull the foot into a more flexed ankle position. Ideally, as the
patient pulls their foot up with a stable leg, the angle created for the
gastrocnemius tightness (knee extended) is 10-12 degrees, and for the soleus
tightness (knee flexed) is 15-18 degrees. In my travels, I have found some
doctors who supinate more than this so will get a normal flexibility of 0-5
degrees. I have also found those who allow the subtalar joint to pronate while
measuring and they will get increased range of motion and less equinus patients
(this is inherent in the Standing Lunge test discussed later). I believe if you
practice this technique on 10 individuals, the average should be 10 degrees
with the knee extended and 15 degrees with the knee flexed, with some being
tighter and some being looser. If your average is less or more than this by
many degrees, you should go back and read through the steps listed above and
review the upcoming photos.
What does this mean? When we take a step,
for smooth transfer of weight forward, our ankles must dorsiflex in the mid
stance of gait. At the middle of midstance, our body’s weight is directly over
our foot, and our ankle joint is at neutral position or 0 degrees dorsiflexed.
As our weight goes forward from here, just as we lift our heels off the ground,
the ankle has now dorsiflexed 10 degrees with the knee relatively straight. As
the heel lifts off the ground, we begin the propulsive phase of gait, with
ankle plantar flexion and knee flexion preparing to lift the foot and toes off
the ground. So, for a smooth gait, the ankle should bend 10 degrees at a time
when the knee is fairly straight (and there is tension on the gastrocnemius).
This is the definition of normal ankle joint dorsiflexion that has been taught
for decades in podiatry schools and that I use in my practice. When the knee is
straight (probably within the last 10-15 degrees toward extension), there is
tension on the gastrocnemius, and if we have less than 10 degrees, we have an
equinus deformity, and if we have more than 12 degrees, we are over flexible.
The measurements are accurate within 2 degrees, and change 2-3 degrees from
morning to night into a more flexible state. It is my experience that finding
ankle equinus (tight achilles) will normally have some effect on gait findings
and symptom relief if reversed.
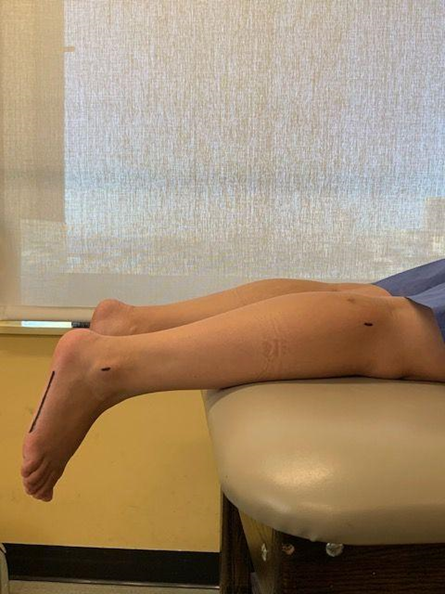
Our landmarks of the plantar surface
of the calcaneus and fifth metatarsal to the bisection of both the lateral
malleolus and head of the fibula
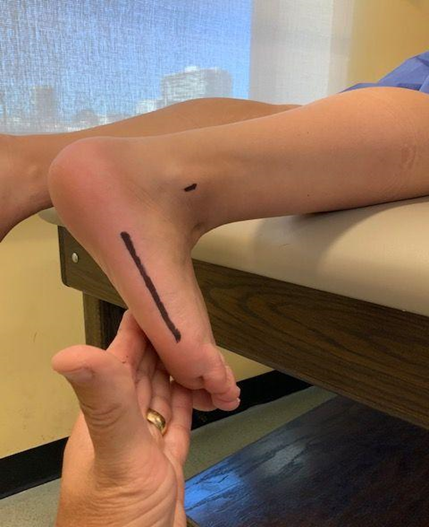
Remember to slightly load the medial
column to prevent subtalar pronation before dorsiflexing the ankle (you will
feel patients trying to pronate to get more degrees and you must resist that
attempt)
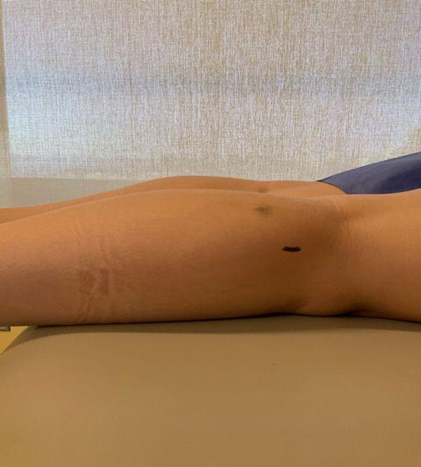
Always watch to make sure the knee
does not hyper-extend with ankle dorsiflexion, especially in known cases of
equinus that you are trying to stretch out
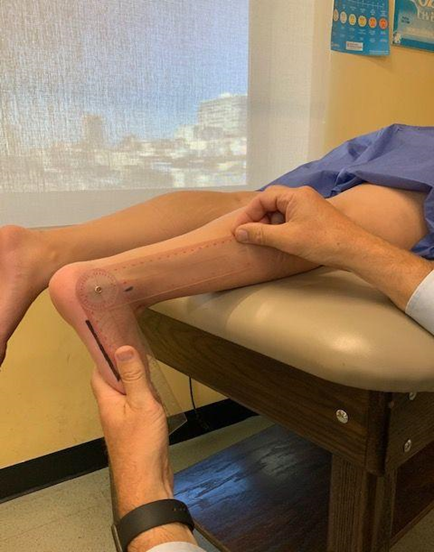
A Goniometer or Tractograph is used
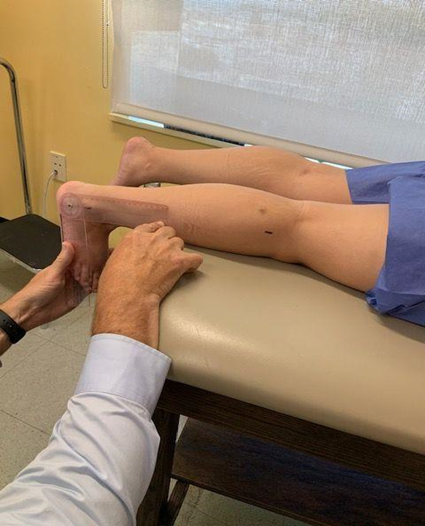
You must have good visual on our
four landmarks while you dorsiflex the ankle to resistance and prevent subtalar
pronation (this takes students awhile to learn as hand positioning is
everything)
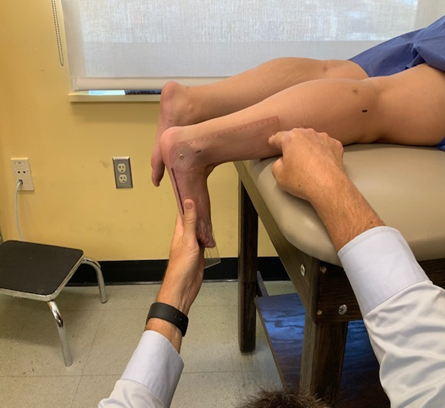
Your Eyes should be at the level of
the measurement (any measurement) that you are performing. Here you can see
that all landmarks are easily visible to me.
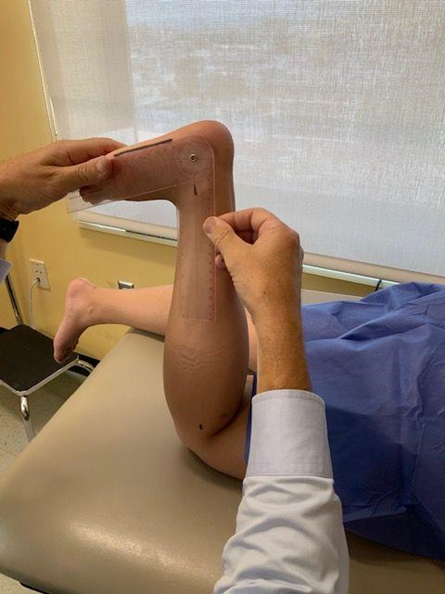
After the straight knee
gastrocnemius evaluation, you will bend the knee and begin to measure for
Soleus flexibility
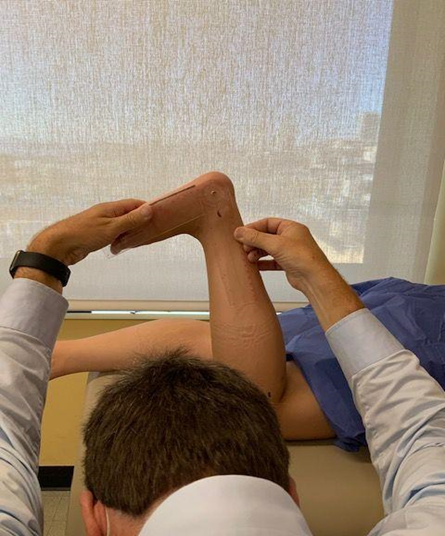
The Soleus is measured with the Same
Landmarks (my head bent only for the photo)
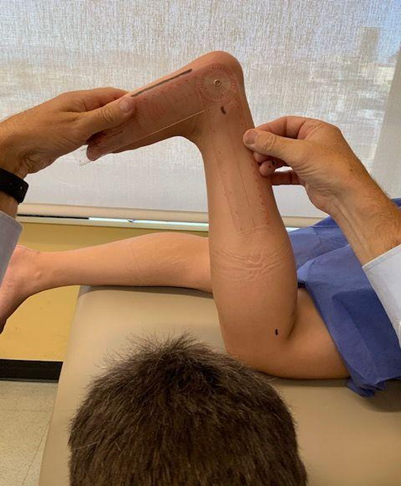
Lateral Foot to Lateral Leg again
making sure the subtalar joint does not pronate by gently loading the medial
aspect of the foot
Practical
Biomechanics Question #126: The reliability of the ankle joint dorsiflexion
test comes from biomechanical experts discovering that the manifestations of
equinus seen in gait (as listed in Chapter 3) correlated to this subtalar
neutral measurement. In most of my equinus patients, I see an improvement in
gait and/or symptoms if I can stretch them out. If you measure equinus, what
gait findings may be present in your patient?
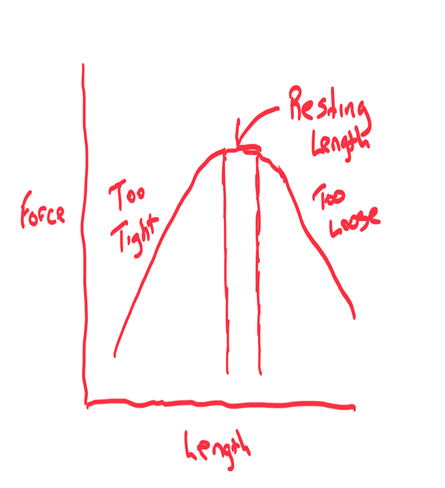
Force Length or Length Tension Curve
This is a perfect time to discuss the
force-length (or length tension) curve of tendons where the normal lower
extremity tendons (Achilles, quadriceps, and hamstrings) have been extensively
measured. Force is the vertical axis and Length of the Tendon is the horizontal
axis of this curve. The normal length of a tendon, where it is considered not
tight or not too flexible, is called the Resting Length, or Normal
Physiological Length. If the gastrocnemius is normal at ankle joint
dorsiflexion of 10-12 degrees, it means it is too tight at less than 10
degrees, and it means it is too loose at greater than 12 degrees. The same is
true for the soleus at 15-18 degrees normal, under 15 tight to some degree, and
over 18 loose to some degree. The Force Length curve argues that away from its
Normal Physiological Length that any tendon becomes weaker. When a tendon is
tighter than it should be, aka muscle-bound, the actin and myosin fibrils are
too bound up, producing less of a neuro-muscular charge, and therefore less of
a powerful contraction. The tighter a tendon is away from its normal, the
weaker it becomes. I have found this so true and it has helped me manage many
injuries with this knowledge. The same is true when the tendon is looser than
normal, it becomes weaker, or more stretched out. Here the actin and myosin
fibrils are not in as close contact with each other, thus less of a
neuro-muscular charge, thus weaker in function.
I am sure as I treat patients that we do
not have to be literal to the exact degree. I have seen so many patients only
manage to length or shorten a tendon half of what I want, and get great results
in the symptoms. If I think it is a problem, I measure patients monthly and
check these results against the changes in their symptoms. Symptoms and tendon
abnormalities measured by this examination go hand in hand.
Practical
Biomechanics Question #127: Every muscle/tendon complex has a certain inherent
tension that makes it function normally and powerfully. What is this called?
There are so many examples of how this is
important, but I will just mention one here. A patient presented to the office
with 2 years of chronic Achilles tendinitis. Previous MRIs and ultrasound had
not found any problem but perhaps some inflammation along the achilles. The
previous treatment had been for Achilles stretching three times a day, orthotic
devices for heel stability, icing, some physical therapy for flexibility,
strength, and anti-inflammatory, and when there was no improvement, some
acupuncture and a surgical opinion to lengthen the tight tendon. Occam's Razor
is that Achilles pain is usually from a tight achilles tendon, and the
treatment was to stretch it out to normal length, so the unsuccessful treatment
was not out of the ordinary. So, why was he not improving?
The Achilles’ tendon definitely had slight
swelling, but not like the fusiform swelling in the zone of ischemia of
tendinosis. The patient could not do 25 single heel raises (my gold standard of
Achilles strength), in fact even one single leg heel raise was both difficult
to do and painful. At this point, you can not be sure if the inability to do a
single heel raise was due to just pain, weakness, or both. However, when I
measured his ankle joint dorsiflexion, I found 29 degrees with the knee
extended, and 34 degrees with the knee flexed. Who knows what the flexibility
was when he started, but his stretching 3 or more times a day for 2 years had
probably gone in the wrong direction. He mentioned that a PT had measured him
at some point, and did not find any tightness, but proceeded to continue
achilles protocol to stretch him out. She was the only one to measure him, and
sadly the doctor who was going to lengthen his tendon had not measured him
(presumably going to do surgery on an assumption not fact).
When I told him I want heel lifts and
shoes with heel elevation nonstop for the next month with no stretching, I
could tell he really did not believe me. I also wanted pain free 2 positional
Achilles strengthening (called double leg heel raises), and it would take a
while to do a single leg heel raise pain free, but two positional was fine to
start and build up to 100 each evening. If he feels tight (weak strained
muscles with some inflammation can feel very tight), which alot of these
patients do, I allow calf massage. After the first month, he was beginning to
feel symptomatically better, and his measurements had reduced to 22 and 29
respectively. By the end of the next month, he had almost no pain, and his
measurements were 17 and 26 respectively. He passed the 30 minutes of pain-free
fast walking test at 2 and ½ months, so I started him on a walk-run program as
part of his Return to Activity program with no speed or hills initially. By the
end of the fourth month, he was running 30 minutes pain-free, and his
measurements were 14 and 24. I told him he was still too over flexible, and not
out of the woods. I discouraged any form of stretching for another couple
months and made sure he warmed up well walking or on a stationary bike before
running. The best I ever measured him in the next few visits, until lost to
followup, was 13 and 22.
Just a quick note on strengthening in cases
like this. His double, and then single, heel raises were done in the evening
only. This will be covered in Chapter 11 Book 3. You do not want the fatigue
from strengthening to cause him symptoms. So, build up strength, go to bed, and
the next day you will be a little stronger. Also, in case the strengthening
irritated the tendon somewhat, there was time to ice the achilles afterwards if
need be.
Practical
Biomechanics Question #128: If an achilles tendon gets over-stretched, what
might you see in gait?
I also want to discuss ankle joint
dorsiflexion measurement weight bearing.
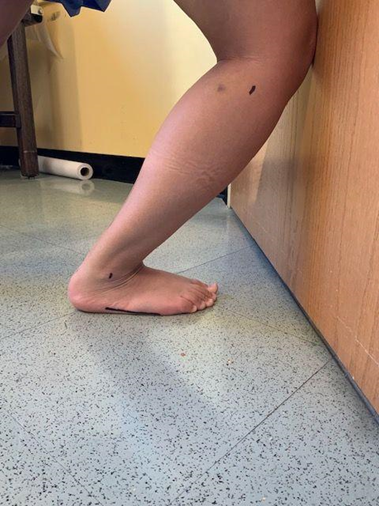
Lunge Test is a Weight Bearing
Version of Ankle Joint Dorsiflexion Flexibility (Soleus version shown here)
This
examination technique will give you more force than the prone method which
definitely means it will give you less equinus in terms of percentage of
patients. The opposite is true with the non-weight bearing technique that holds
the subtalar joint maximally supinated during the examination. This will
definitely give you more patients below the normal 10-12 degrees with the knee
extended therefore considered equinus patients. I can only say that there is
validity to all three techniques for different reasons. The weight bearing
technique (and the maximally supinated non weight bearing technique) uses the
same measurement of fifth metatarsal to plantar calcaneus, and lateral
malleolus to head of the fibula. There is an attempt at holding the patient in
subtalar neutral, even better if your orthotic devices approach that position
so the patient can just stand on their orthotic devices for the Lunge Test. The
weight bearing loading of the foot stretches the plantar tissue and can allow
the front of the ankle to slide forward even when the subtalar joint is
stationary near neutral. I would love to see if the criteria of positive gait
findings for equinus matches these patients. In teaching examination techniques
for years, I find that the most important thing is that each practitioner
measures with one technique over and over again, and therefore will develop
reliability with these tests. If the patient demonstrates equinus in gait, and
the test that you perform documents equinus, there is no reason to change. We
are using our measurements to find clues to successfully treat our patients.
The simple Lunge test deserves further
discussion. The left foot is 2 feet or so in front of the right foot, same base
of gait, and the patient flexes both knees just to the point of the heels
wanting to come off the ground. The angle of the tibia to the ground is
measured with 35-38 degrees being normal. Over 38 degrees and the patient is
considered hypermobile, under 35 degrees the patient is considered tight. I use
an app (Bubble Level XL) on my iphone to measure, and then I can follow them
through their stretching or strengthening program. I look at this as a
screening tool, since you really should get an average of 5 tests to be
reliable, and this test does not have a reliable fixed point that you are
measuring against since both the foot is moving and the tibia is moving (unlike
the fixed tibia on the moving foot with my preferred subtalar neutral non
weight bearing test). The examiner has to find a tool he can use that will show
change (so it has to be reproducible to the examiner). The same test can be
done with the knees straight to measure gastrocnemius flexibility.
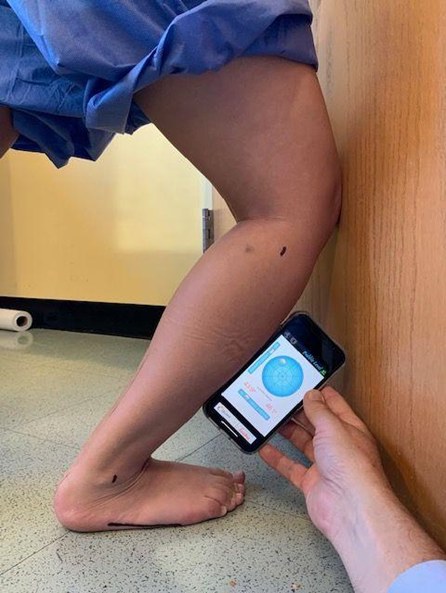
Bubble Level XL app noting 45
degrees of Soleus Flexibility (Knees Bent)
Practical
Biomechanics Question #129: Which 4 achilles flexibility tests for the achilles
tendon are utilized in the profession, and what is the criteria for reliability
utilizing gait patterns?